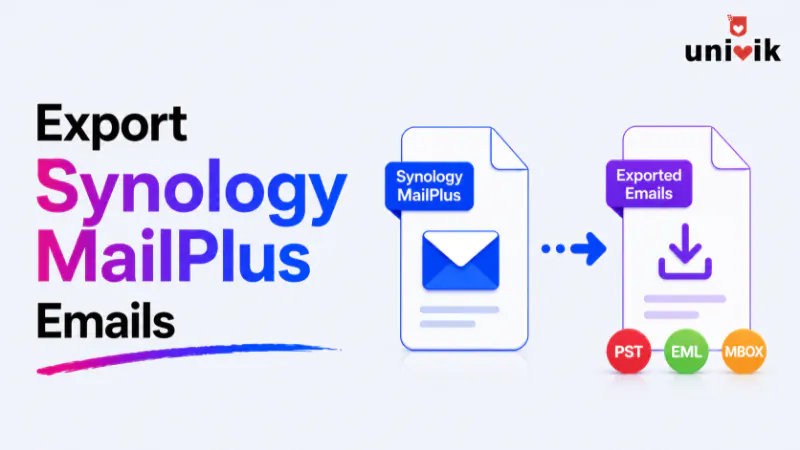
On DSM 7, MailPlus Server exports email as PST files only. There are two export paths. Admins export any account via MailPlus Server → Account → User → select the account → Import/Export → Export. Regular users export their own mailbox via the MailPlus client: click your account name (top right) → Settings → Mailbox → Export. The user export option is hidden by default until an administrator enables it. If you cannot see the Export option anywhere, jump to this section. On DSM 6, export produced MBOX files through a different path that is covered at the bottom of this guide.
Cannot see an Export option anywhere in MailPlus?
If you are looking for an Export option and cannot find it, you are in the right place. The Export option for regular users is hidden by default and only appears after an administrator enables it. Jump to Cannot See the Export Option? Read This for the fix.
First: Which DSM Version Are You Running?
The export format and the export location changed between DSM 6 and DSM 7. Before following any steps, confirm which version you are on.
How to check your version: Open DSM. Click Package Center in the main menu. Find MailPlus Server in your Installed packages. The version number shown next to it tells you which path to follow. Version 3.x or 4.x means you are on DSM 7. Version 1.x or 2.x means you are on DSM 6. This is the most direct check: it tells you the MailPlus Server version and the DSM family in one step.
| Your Version | Export Format | Where to Find It |
|---|---|---|
| DSM 7 (MailPlus Server 3.x or 4.x) | PST only | Account → User → Import/Export (admin) or Settings → Mailbox → Export (users) |
| DSM 6 (MailPlus Server 1.x or 2.x) | MBOX only | Storage → Back Up in MailPlus Server admin |
If you are on DSM 6, skip to the DSM 6 section at the bottom. If you are on DSM 7, continue below.
Two Ways to Export MailPlus Server Email: Admin vs Regular User
MailPlus Server has two different export paths and they work differently.
I am an Admin (I manage the NAS)
- You can export any user’s mailbox
- You access it through the MailPlus Server admin panel
- The PST downloads directly to your browser
- No policy needs to be enabled for admin export
- Go to admin export steps →
I am a Regular User (I just use email)
- You can only export your own mailbox
- You access it from inside the MailPlus webmail interface
- The export runs in the background you get an email when it is ready
- An admin must enable this option before it appears for you
- Go to user export steps →
For Admins: Export Any Account as PST
As an administrator, you can export any user’s mailbox including deactivated accounts directly from the MailPlus Server admin panel. The PST file downloads to your browser immediately when the export is complete.
Official reference
These steps follow Synology’s official MailPlus Server Administrator’s Guide version 4.0. For screenshots and the full admin guide, visit the Synology Knowledge Center MailPlus Server Admin Guide.
Step-by-Step: Admin PST Export
Open MailPlus Server.
Log into DSM. Click the grid icon (main menu) in the top-left corner. Select MailPlus Server from the list of installed packages. The MailPlus Server admin panel opens in a new tab.
Go to Account, then User.
In the left sidebar of the MailPlus Server panel, click Account. A submenu expands. Click User. You will see a list of all mailboxes both active users and deactivated accounts are shown here.
Select the account you want to export.
Tick the checkbox next to the username. Only one account can be exported at a time if you select multiple checkboxes, the Import/Export button may not behave as expected. Repeat the export for each account separately.
Click Import/Export in the toolbar, then click Export.
With the account ticked, the Import/Export button in the top action bar becomes active. Click it. A small dropdown appears with two options: Import and Export. Click Export.
Choose the mailbox and tick Include sub-mailboxes.
A dialog box opens. Select the mailbox from the dropdown (usually the default is correct). Tick Include sub-mailboxes this ensures all folders are exported, not just the Inbox. Custom folders, Sent, Drafts and any nested folders are all included when this option is ticked.
Click Export to download the PST.
MailPlus Server generates the PST file. A progress indicator appears. When complete, your browser automatically downloads the file. The PST is saved to your browser’s default download folder. The filename is typically the email address followed by .pst for example, john.smith@company.com.pst.
Repeat for each account you need to export.
Go back to Account → User and repeat steps 3 to 6 for each additional mailbox. Name each downloaded PST clearly include the date and the account name in the filename so you can identify them later.
Exporting a former employee’s account (deactivated)?
Deactivated accounts appear in the Account → User list alongside active accounts. The steps are identical tick the deactivated account, click Import/Export, click Export. The email data is preserved after deactivation and exports fully. See our guide to exporting deactivated accounts for the compliance and legal hold context.
Enable the Export Policy (Required for User Self-Export)
Before a regular user can export their own mailbox from the MailPlus web client, an administrator must switch on the export policy. This setting is off by default which is why users who go looking for an Export option find nothing.
This only needs to be done once. After it is enabled, all users on the system can see the Export option in their MailPlus client settings.
If users tell you they cannot find the Export option this is what to enable.
The most common reason users report no Export option in MailPlus is that this policy was never switched on. Follow the four steps below and the option will appear for users on their next login.
Step-by-Step: Enabling the Export Policy
Open MailPlus Server from DSM.
Log into DSM as an administrator. Open MailPlus Server from the main menu.
Go to Service, then MailPlus Client.
In the left sidebar, click Service. From the expanded submenu, click MailPlus Client. This page controls what regular users can see and do inside the MailPlus webmail.
Find the Mail Export section and enable user mailbox export.
Scroll down the MailPlus Client settings page until you see the Mail Export section. Enable the option labelled Allow users to export mailboxes. Once this toggle is on, the Export option becomes visible to all users in their MailPlus client.
Optionally: also enable export for deactivated accounts.
Still in the Mail Export section, there is a second option: Allow users to export mailboxes of deactivated accounts. Enable this if account owners or managers need to export the mailbox of a former employee or a disabled account from within the MailPlus client. If you do not enable this, users can only export their own active mailbox.
No restart needed changes take effect immediately
You do not need to restart MailPlus Server or DSM after enabling this policy. Users who are already logged into the MailPlus client need to log out and back in for the option to appear. Users who log in fresh will see it immediately.
For Users: Export Your Own Mailbox
If your administrator has enabled the export policy, you can export your own mailbox as a PST file directly from the MailPlus webmail interface. You do not need admin access or any special permissions beyond a normal user account.
Cannot see the Export option? The policy is not enabled yet.
If you follow these steps and cannot find Settings → Mailbox → Export, your administrator has not yet enabled the export policy. You cannot enable it yourself. Send your admin a link to the section above (Enable the Export Policy) and ask them to switch it on. It takes less than two minutes.
Step-by-Step: User Self-Export
Log into the MailPlus web client.
Open the MailPlus webmail in your browser and sign in with your normal email account credentials. Do not use the DSM admin account for this use your own email login.
Click your account name in the top-right corner, then select Settings.
Look for your name or email address in the top-right corner of the MailPlus interface. Click it. A dropdown menu appears. Select Settings.
Click Mailbox in the Settings panel, then click Export.
Inside Settings, you will see a list of categories on the left. Click Mailbox. On the Mailbox settings page, find and click Export. If you do not see a Mailbox section or an Export option, the admin has not yet enabled the export policy see the note above.
Select the mailbox and set a date range if needed.
Choose which mailbox to export from the dropdown. Tick Include all sub-mailboxes to include all your folders. Optionally set a date range if you only need email from a specific period. Leave the From field blank to export everything from the earliest email in your account.
Click Export to start the task.
Click the Export button. The export runs in the background it does not download immediately. MailPlus will send you an email notification when the export is complete and ready to download. For large mailboxes, this can take several hours.
Download your PST file when you receive the notification.
When the export is ready, you will get an email in your inbox. Follow the link in the email to download the PST file. The file is kept available for 14 days download it before then or you will need to run the export again. Only one export task can exist at a time, so make sure you download and clear the current export before starting a new one.
Cannot See the Export Option? Read This.
This is the most common question from MailPlus users. If you cannot find an Export option anywhere in the MailPlus client, here is exactly what is happening and what to do about it.
| What You Are Seeing | What It Means | What to Do |
|---|---|---|
| Settings → Mailbox → Export is missing | Admin has not enabled the export policy | Ask your NAS admin to go to MailPlus Server → Service → MailPlus Client → Mail Export → enable Allow users to export mailboxes |
| Import/Export button is greyed out in MailPlus Server admin | No account is selected in the user list | Tick the checkbox next to the username first, then click Import/Export |
| You are an admin but do not see Account → User in the sidebar | You may be looking at the MailPlus webmail, not MailPlus Server | Go back to DSM main menu and open MailPlus Server (the admin panel), not MailPlus (the webmail) |
| Admin export: you click Export but no file downloads | A browser popup or download blocker is preventing the file download | Check your browser’s download bar or popup settings. Allow downloads from the DSM address and try again. The admin export triggers an immediate browser download popup blockers can silently block it. |
| User export: you click Export but nothing seems to happen | The export is running as a background task. It does not download immediately | This is normal. MailPlus queues the export and sends you an email notification when it is ready (can take minutes to hours for large mailboxes). Check your inbox for the notification, then follow the download link. |
Confused about MailPlus vs MailPlus Server?
These are two different applications. MailPlus Server is the admin control panel this is where export policies are configured and admin-level exports are run. MailPlus is the webmail application that regular users access for reading and sending email. If you are looking in the wrong one, the options will not be there. See our MailPlus vs MailPlus Server guide for a clear explanation of the difference.
What to Do With Your PST File
The PST file you downloaded contains all your MailPlus email in Microsoft Outlook format. Here is what you can do with it.
Open in Outlook
Open Outlook on any Windows PC. Go to File then Open and Export then Import/Export then Import from another program or file then Outlook Data File (.pst). Select your PST. Your email and all folders import directly. No conversion needed.
Move to Microsoft 365
Upload the PST to Microsoft 365 via the Exchange Admin Center import service. Important: Microsoft 365 has a 10 GB limit per PST file. Split large mailboxes by date range if needed. See our MailPlus to Microsoft 365 guide.
Convert to PDF, EML or More
Use Univik Synology MailPlus Converter on Windows to convert PST to PDF for long-term archiving, EML for cross-platform use or MSG for individual message storage. Works completely offline. No NAS connection needed.
How to View Your Exported MailPlus Email
Once you have exported your MailPlus mailbox (PST on DSM 7 or MBOX on DSM 6) you can browse the emails directly without importing them into Outlook or any other email client. This is useful for searching a specific message, checking an archive before migrating or reviewing a former employee’s mailbox.
Two paths are available depending on whether you want a single tool for both formats or a dedicated viewer per format.
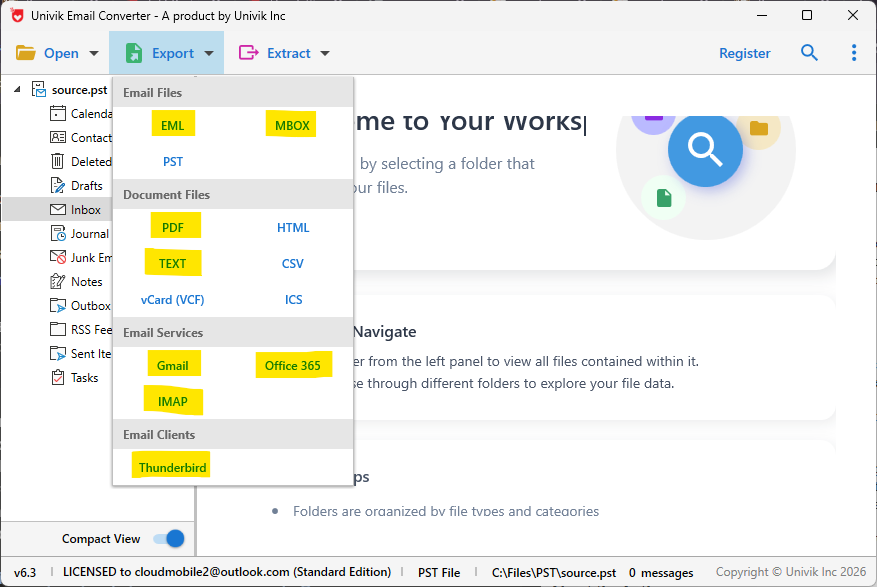
Option 1: Open Directly in Univik Synology MailPlus Converter
Univik Synology MailPlus Converter includes a built-in viewer. It opens both PST files (exported from DSM 7) and MBOX files (exported from DSM 6) without any import step. Open the file, browse all folders and read any message attachments included.
Click the Open button in the toolbar. A menu shows all supported file types. Select Outlook PST / OST Files for DSM 7 exports or MBOX Files for DSM 6 exports. Navigate to your exported file and open it.
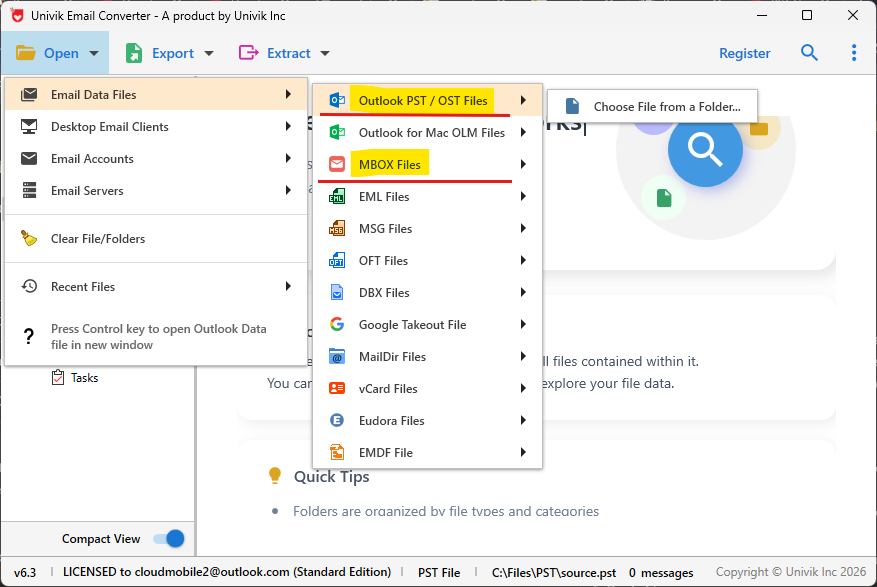
Browsing an exported MailPlus mailbox directly in Univik Synology MailPlus Converter
The Open menu supports more than just PST and MBOX. As shown in the screenshot, it lists PST / OST Files, MBOX Files, EML Files, MSG Files and several other formats under the Email Data Files category. If you have converted your MailPlus export to EML or MSG, those open the same way just choose the matching file type from the menu.
Option 2: Use a Dedicated Viewer Product
If you only need to view files and not convert them, Univik offers standalone viewer tools for each format. These are lighter than the full converter and focused purely on opening and reading email files.
PST Viewer
For PST files exported from DSM 7 (MailPlus Server 3.x and 4.x). Open any PST file, browse all folders, read messages and view attachments without Outlook installed.
MBOX Viewer
For MBOX files exported from DSM 6 (MailPlus Server 1.x and 2.x). Open any MBOX file and read all emails with full folder structure, without needing Thunderbird or any email client.
Which tool to use? If you exported from DSM 7, open your PST with the PST Viewer or in Univik Synology MailPlus Converter. If you exported from DSM 6, open your MBOX files with the MBOX Viewer or in the converter. The full converter is the better choice if you plan to convert the files afterward you can view and convert in the same tool without switching.
MailPlus only exports PST. You are not limited to PST.
Synology MailPlus Server gives you one export format: PST. If you need your email as PDF, EML, MSG, MBOX, HTML or want to migrate directly into Gmail, Outlook, Yahoo Mail or another email service, Univik Synology MailPlus Converter connects directly to your MailPlus account over IMAP and exports to 20+ formats in a few clicks.
Export to PDF, EML, MSG and More: Not Just PST
Synology MailPlus Server is designed as an on-premises email system, not an archiving tool. Its export feature covers the basics PST for Outlook, nothing else. That is a deliberate product decision, not a flaw. But it does mean that if your goal is compliance archiving (PDF), cross-platform migration (EML) or moving to a new email provider, the built-in export does not get you there.
Univik Synology MailPlus Converter fills that gap. It connects to your MailPlus account directly over IMAP the same protocol Outlook uses to read your email and converts your mailboxes to whichever format you need. You add your MailPlus account once, choose the output format and the software does the rest.
Before you start required setting
Enable IMAP in Synology MailPlus Server
The Univik Converter connects to your MailPlus account over IMAP. IMAP must be enabled in MailPlus Server before the converter can reach your account. It may already be on this check takes 30 seconds.
Open MailPlus Server from the DSM main menu.
In the left sidebar, click Service. Then click MailPlus Client.
Under the Protocol section, make sure IMAP is ticked. If it is off, enable it and click Apply.
IMAP lets email clients and tools read your mailbox remotely. Outlook uses IMAP. Univik Converter uses it the same way.
How to Use Univik Converter With Your MailPlus Account
Once IMAP is enabled, open Univik Synology MailPlus Converter on any Windows machine on the same network as your NAS. You do not need to export a PST first the converter reads the live mailbox directly via IMAP.
Add your MailPlus email account
Open the converter and click Add Account. Choose the IMAP option and enter your MailPlus email address. The software connects to your NAS and reads your mailbox folder list to confirm everything is working before you proceed.
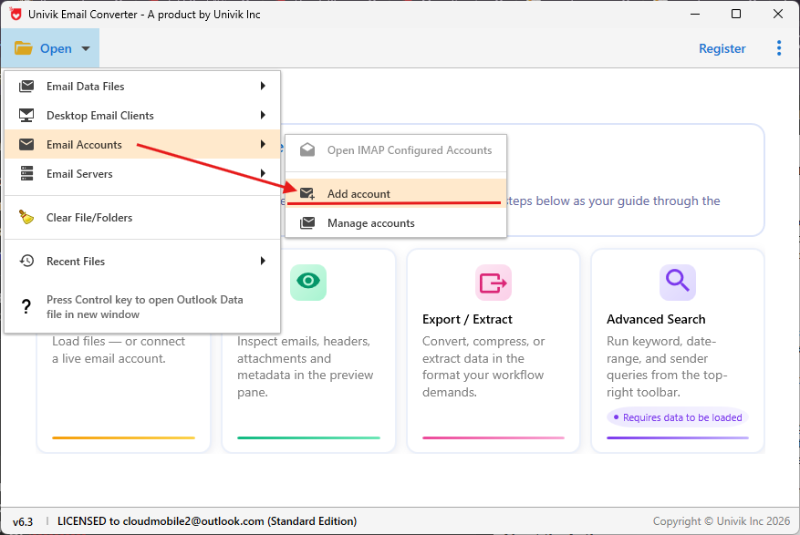
Step 1 Add your MailPlus account in Univik Synology MailPlus Converter
Enter your MailPlus Server IMAP details
Enter your NAS hostname or IP address, IMAP port (993 for secure IMAPS or 143 for standard IMAP) and your MailPlus account credentials. These are the same details you would use to set up Outlook or Thunderbird to read your MailPlus email.
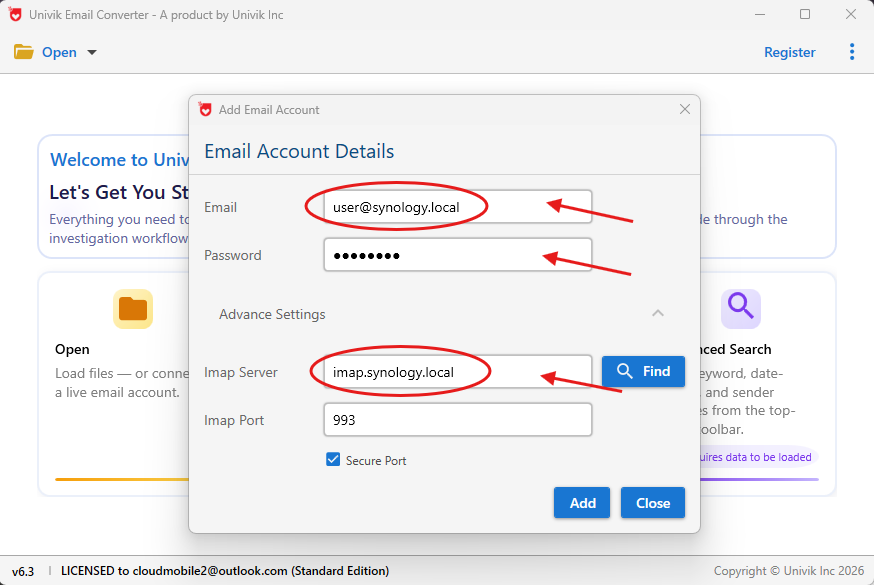
Step 2 Enter the MailPlus Server IMAP connection details
Choose your output format and export
Select the folders or accounts to export. Then pick your output format from the full list below. Click Convert. The software exports your email with the same folder structure you see in MailPlus Inbox, Sent, custom folders and all subfolders are preserved in the output.
Step 3 Choose from 20+ export formats and online email migration options
Supported output formats and migration destinations
Bottom line: Synology MailPlus restricts built-in export to PST only. Univik Synology MailPlus Converter removes that restriction connect directly over IMAP and export to any format, or migrate straight into Gmail or another email service without touching PST at all.
On DSM 6? The Export Path Was Different
If your NAS is still running DSM 6 with MailPlus Server 1.x or 2.x, the export format was MBOX and the location was different. This path no longer exists in DSM 7.
Planning to upgrade from DSM 6 to DSM 7?
Export your MBOX files from DSM 6 before upgrading. Once you upgrade to DSM 7, the MBOX bulk export path in Storage → Back Up is gone. You will only have the PST per-account path. See our DSM 6 to DSM 7 email migration guide for the full sequence.
DSM 6 Export Steps (MailPlus Server 1.x and 2.x)
Open MailPlus Server on DSM 6. Log into DSM 6 as admin. Open MailPlus Server from the main menu.
Go to Storage then Back Up. In the left sidebar, click Storage then Back Up. This path no longer exists in DSM 7 it was removed in MailPlus Server 3.x.
Select accounts and a destination shared folder. Choose all accounts or specific ones. Set a NAS shared folder as the output destination. The export writes MBOX files one per folder per account to that folder.
Copy the MBOX folder off the NAS. After the export completes, copy the MBOX folder to a Windows machine or external drive. Univik Synology MailPlus Converter can convert these MBOX files to PST, PDF or other formats offline.
Frequently Asked Questions About MailPlus Export
Why can’t I see an Export option anywhere in MailPlus?
The user-facing Export option is hidden until an administrator enables it. To enable it: open MailPlus Server → Service → MailPlus Client → scroll to Mail Export → enable Allow users to export mailboxes. Once enabled, the option appears immediately for all users under Settings → Mailbox → Export. If you are a regular user without admin access, forward the admin steps in this guide to your IT administrator and ask them to enable it.
Does MailPlus Server DSM 7 support MBOX export?
No. MailPlus Server 3.x and 4.x on DSM 7 export PST format only. The MBOX bulk export that existed in MailPlus Server 1.x and 2.x on DSM 6 under Storage → Back Up was removed in MailPlus Server 3.x. If you need to convert a PST to another format such as PDF or EML, use Univik Synology MailPlus Converter.
How long does the user self-export take?
The export runs as a background task. A small mailbox (a few hundred emails) completes in minutes. A large mailbox with years of messages and attachments can take several hours. MailPlus sends you an email notification when the export is ready. You do not need to keep the browser open while it runs.
How long is the exported PST file available to download?
Synology keeps exported PST files available for download for 14 days after the export completes. After 14 days the file is automatically deleted and you would need to run the export again. Download your PST as soon as you receive the notification email.
Can I have multiple export tasks running at the same time?
No. Only one export task can exist at a time per user. If you already have a pending or completed export, you must download it and clear the task before you can start a new one.
Where does the admin export PST go?
The admin export (via Account → User → Import/Export → Export) downloads the PST directly to your browser’s download folder on the machine you are using to access DSM. It does not save to a NAS shared folder. Make sure the machine you are working on has enough free storage space before starting a large export.
What is the difference between the admin export and the user self-export?
The admin export (via MailPlus Server) can export any account, downloads instantly and does not require any policy to be enabled. The user self-export (via the MailPlus web client) can only export the logged-in user’s own account, runs as a background task with an email notification when ready and requires an administrator to have enabled the export policy first.
Exporting MailPlus Server Email: Quick Reference
Exporting email from MailPlus Server on DSM 7 comes down to two questions: are you an admin or a regular user and has the export policy been enabled?
Admins can always export any account via Account → User → Import/Export → Export in MailPlus Server. No policy needs to be enabled for this path.
Regular users need the admin to enable the export policy first Service → MailPlus Client → Mail Export. Once that is done, users find the Export option under Settings → Mailbox → Export in the MailPlus web client and the PST arrives by email notification when ready.
If neither path is producing results, the troubleshooting table in the Cannot See the Export Option section covers the most common causes.